

Back again with the next part of Grim’s Dungeons of Doom, and more adventures in expanding foam, and how you can craft some decent scenics with this little used material.
OK, for part three, we are going to deal with cavern features, mainly hazard pools and stalagmites. I’ve opted here to create pieces that illustrate both at once, but there’s no reason you couldn’t do them independently if you wanted.
As ever, you’ll need your trusty expanding foam gap filler, some textured wallpaper, a few wooden sticks (skewers or toothpicks will do, use whatever you have) a sturdy base (MDF/Thick card/hardboard etc) and some sand for texture. Although you don’t need to go full throttle on the paint effects for the pools, you’ll need your usual acrylic paints, some inks, and some glass paint to achieve the finish on these.
A note on glass paints. Acrylic glass paint is a really useful paint type to have in your crafting arsenal. Think of it as a type of thick viscous ink or glaze. It dries glossy and clear, so you can achieve some decent effects with them. They mix down with water, ink, water based paints, so they are great to experiment with. I find them very hard to get hold of where I am (No decent craft shops anymore here) but they can be found on the web. My set currently I found at a cheap shop while on holiday, and since they were only £1, it was a great deal. Glass paints usually go for £2-£3 each so look out for them!
Right, first of all, get your textured wallpaper. The one I’m using is called Arundel I think, and it’s really great for simulating cobbles, bubbles and similar. I’ve used it before in the Walls tutorial, but its uses go way beyond just cladding stuff, here’s a look at the texture:
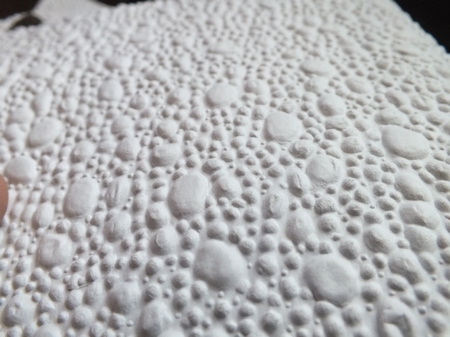
This is what we’ll be using for the bubbling pools on the models. Next you’ll need to cut out a piece to stick on your base. make this any size you wish but leave some space around the edge to texturise your base and form the lip of the pool.

When its stuck down, get out the foam filler and carefully lay down the filler around the pool,making sure you only go around the outside, leaving the textured paper alone.

Next, spread the foam around and start to manipulate it with a wooden stick and spread it around to form interest and detail as we did before in part 1 and part 2. As you start to work it, you’ll notice that your stick will start to get bunged up with the drying foam, you’ll need this if you want to add stalagmites, so get them gunked up as you work the foam, gently adding more as you need it. As the foam dries, you’ll be able to shape it with your fingers, so shape the foam covered sticks into a rough point at one end, these will form the tips of the stalagmites. Make as many as you like of all sizes.

As the foam dries, you can also cut sticks to size and position them into the piece. These sticks are then covered by adding more foam and covering them by the manipulation method. make sure you keep them upright as the foam dries otherwise they will set at odd angles.

Separate foam stalagmites can be inserted into the piece easily by leaving a small peg on the foam covered wood and making a small hole in the foam. Glue them in using strong glue of your choosing.

Add some texture by flocking with course sand or simliar, this will break up any smooth areas and create a more natural impression to the piece.

After this, undercoat it black and start your cavern paint scheme on the foam areas only. Leave the pool, just paint the rest of the piece to match your other cavern terrain.

Once you have done the basics on the foam areas, give the pool a good solid coat of bright yellow. For good coverage, you may want to do this 2 or 3 times to build up a good solid block colour as the base of the lava.

Once it’s dried, start drybrushing over it with bright orange up to bright red as the base of the lava. Lightly drybrush the area around the edge too, this will give an eventual glow effect. Once they have dried, give the area a light drybrush of black as well, before moving onto the next step.
The effect here was achieved by firstly giving the lava pool a thick yellow wash to get the area wet enough for the glass paints to flow realistically through the channels of the texture detail. Use the combination of the thick viscous glass paints and acrylics to build up the appearance of runny lava flow, go yellow, then red, yellow, red until the layers look to your desired effect. Also take a toothpick and try and drag them into each other while drying to add even more detail. Keep adding layers until your satisfied. You may need to build up 5 or 6+ before you get the effect here. When totally dry, retouch the burnt black exposed areas, then seal in with a nice clear gloss.


The green ooze effect is exactly the same technique, only using a combination of greens and yellows in ink, acrylic paint and green glass paint.


There are lots of other results you can get from this technique, blood pools, sludge brown and so on, use your imagination!
It’s a great end look, that isn’t too hard to get, albeit a bit time consuming! It’s easier than one would think to get the effects, so give it a go!
So, I hope that this section of Dungeons of Doom has shown that Foam gap filler is indeed a great material to have in your craft supplies, and I’ll be featuring it in conjunction with other makes in the future. I know that there’s a few out there that have commented on how foam filler looks like what it is and that it could be a poor choice, but I disagree. Try experimenting with it to see what other uses it could fit, and you’ll be surprised if you think out of the box!
I’ll be back next time for more Dungeons of Doom…
Infect the world with Grinning Skull goodness, spread the word:
Tags: 25mm, 28mm, Acrylic paint, adventures in expanding foam, cavern, cavern features, caves, dungeon, Dungeon crawl, dungeoneer, Dungeoneering, Dungeons of doom, expanding foam, Fantasy, Foam, gap filler, Grim's dungeons of doom, Grim's Modelling Tips, Miniatures, model, Paint, Painting, Recreation, Role-playing game, Roleplaying, RPG, scratch built, Stalagmite, terrain, wargames, wargaming


Recent comments from our readers