

PART 3: The Base Board.
As promised, here’s the next part of the dungeon build. This time we are going to be talking about making dungeon floors, more specifically a flagstone floor base board like the one in my own modular dungeon system.

First off your going to need a large board as the base for your floor. I used a piece of hardboard for mine, its cheap and easy to work with. You could use whatever you want, I just used it as I have several big bits laying around, but MDF or thin ply would do just as well. The added bonus for me at least is that large thin pieces are easy to store behind wardrobes and other furniture out of harms way until I need to use it. If storing large pieces is problem, you could use smaller bits that fit together (even though I have one big main one, I do have a couple of smaller ones for when I run out of room to create bigger dungeons.)
What you will need for this method is textured foam backed bathroom mosaic tiled wallpaper. Using this stuff is fantastic for terrain making in general, its uses go far beyond just dungeon flooring. It saves a ton of time carving and making detail, as its all done for you.

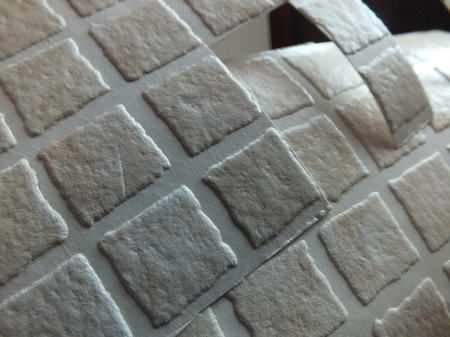
As you can see, it has a raised stone effect pattern. Ideal for simulated flagstones. At 28mm size it has loads of detail that will give you a brilliant effect, check out this close up and you’ll see what I mean.
It comes in a variety of colours, all of which are just as good (since you’ll be painting it anyway) If your willing to fork out for a roll of it, it’ll set you back under £10 (thats in the UK, I’m pretty sure you can track down something similar in the rest of the world) If you don’t want to put your hand in your pocket, a good way of getting it is to visit your local decorating or DIY shops, or where ever sells wallpaper where you are. Most of the time, these shops will be more than willing to give you big sample pieces for you to take home. A good idea if your doing this, is to not reveal what you want the bits for, just tell them your redecorating and not making models with it! Another way to get sample pieces is to go online and ask. This is better for smaller terrain bits since they are usually A4 sized sheets (easy for the companies to send through the post) My advice is to go and buy a roll or two of your preferred textured paper, it’ll serve you well and you’ll have more than you’ll ever need. The online ordering of samples is good too as you’ll be able to go to at least 10+ different places and get loads of free textured sheets for other projects, these below are some decent ones I’ve been using during this build.


Ok, so back to the build. The next bit is quite simple, no big mystery. Get your board and stick your paper to it! You can use PVA or wallpaper paste, although PVA dries quicker.make sure if you have more than one piece to stick to the board, to line it up carefully and accurately of it’ll look wrong.
Once you have done that and its dry, paint it up black with either cheapo spray, or some other cheap paint. You can by all means use acrylic, but I recommend using the cheapest way you can, as you can get through a ton of paint if your making large areas like this. Water based emulsion wall paint is great if you can get it in black or dark grey (I think its called latex paint elsewhere)
As you can see, my dungeon pieces are grey stone, so I advise for the uniformity and look you use the same colour scheme and tones for the whole dungeon. I achieve this by the emulsion method. I use the same mid grey wall paint for everything then it all tones in.
Once you have the undercoat done, gradually start drybrushing the board with dark grey graduating up to your desired tone you prefer (if you use emulsion, you can use cheap white emulsion to lighten it up,what ever you can get your hands on.)
Don’t forget to seal it in with some matt varnish (I used several coats,which is why some thought I’d used linoleum for the flooring, which you could do, although it might make the process more expensive, and your board lots heavier!)

And thats all there is to it. if you follow this process and advice, you’ll have a base board for your dungeon similar to mine! as you can see from the above pic, it looks very cool, and requires minimal effort and is quick to do.
So, I hope you enjoyed this article and got something out of it, so next time I’ll be telling you how to construct your wall pieces, again really quick and simple and a nice end result. Ciao!!


Recent comments from our readers