

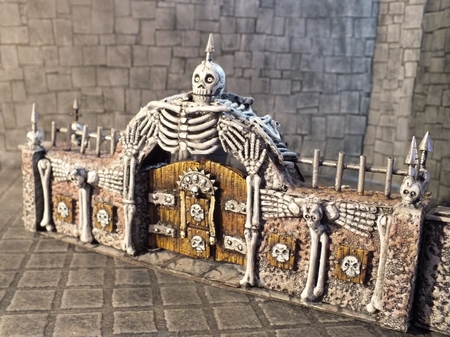
It’s Saturday, and that means it’s yet another post for Grim’s Dungeons of Doom, that being of the advanced (but still quite easy) version of the cemetery gateway, actual opening gates. I have tried to use alternatives methods and materials to give you some different ideas that you can take away and adapt for your own builds on a variety of model projects.

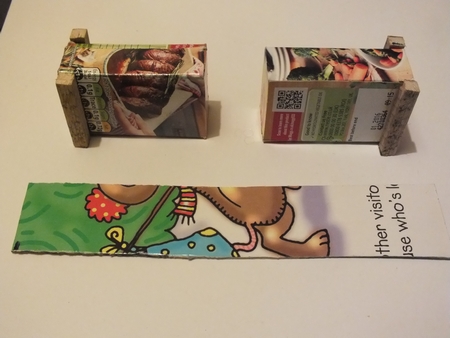
This time, to construct the wall sections on this piece, we are going to use a pre-existing shape, that being a small similar sized box. Its a little bigger and thicker than the usual sections, but since this is a frontispiece it doesn’t matter too much.
Divide the box into two identical sized sections, then proceed to fold in the open edges to form two box sections as below.

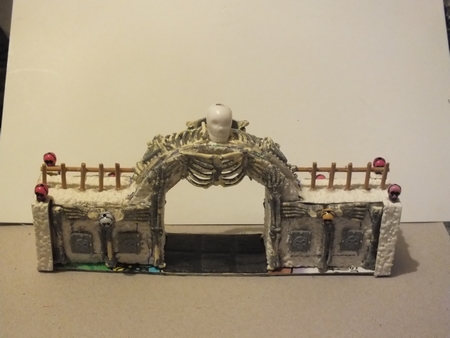
Take some square dowel (or similarly cut foam core/board or other material to the same dimensions roughly) and cut 4 pieces to the height of the wall.

Attach these to the ends to form this as in the pic below. These squared ends are simply to help align the finished piece to other finished dungeon sections without gaps.
Affix the sections to a base of thick card etc. Again this is the same length as the longest dungeon wall sections in my set. This helps make a better fit with the other wall sections.

Texture with wallpaper as per other pieces in these articles, or you could use the small card squares technique in the wall article, or filler,or modelling paste/putty, if you can’t get textured wall paper easily.

A semicircular shaped piece was constructed from thick card and coated with the textured paper. You could forgo this step if you wanted for a simpler gateway shape, I just wanted both gateways to match aesthetics since I’d be using them together to form an enclosed cemetery during play, so some sort of dome framing looked better.

Stick the top piece on top to form the basic shape. also added was some tiled textured paper to match the floor space in the middle.

Next I got some small sticks and pushed them into small holes all at the same height. Do this at both sides making sure it looks right. Once happy, glue them in. For a spiky top, you can use bamboo skewers or tooth picks.

Start to detail your piece in a similar fashion to the cemetery gateway as before, remember to keep the main gateway clear of obstruction, you’ll be adding the doors later so it’s important that they open and close, and your able to fit and refit them if you need to.

Take two more sticks and attach horizontally to create a solid fence. You can bind the uprights to the piece with cotton and a needle for extra detail, but I haven’t here to save time.

Continue to adorn the piece using whatever you like, skull beads, cut up skeleton bits and so on just as the gateway before (so it matches the style) but you could adapt this to fit a variety of different themes (Greenskins, elven, chaos, whichever you like)


Now the mechanism. This is a simple system, all you need are some wide headed nails and some drinking straws that fit snugly to the same dimensions as the nails. I have these short tack type roofing felt nails and kids juice box drinking straws here as they are a great fit. If using this technique, take some time to get the right fit as getting the fit wrong will cause some problems with the whole mechanism, too tight and you can’t open the damn thing, too loose and it won’t move right etc. You can use all sorts of size nails but for this I chose shorter ones so I can keep dry fitting the doors to get it right. A door was cut that fits the whole front of the opening, but this will be shortened in progress to make sure we get a good fit (as in the real world, doors can be a pain to fit, so expect to keep offering the doors up to get it right.) Also you’ll see that I haven’t cut the doors in half to fit the two pieces, but don’t worry, like I said, they will be trimmed a bit at a time to get them right. Also I added a small ridge at the top at each side so when the doors are dome and clad, there will be some shape too.

Next affix the nails to the desired location in the centre of the opening, make sure to leave a small gap of a millimetre or so, to allow the doors to pivot and open, these will form the turning mechanism for your fold out doors, so this is important to get this right.

Construct the doors by taking off the width of the thickness of the straws at either side. when this is done cut the straws to the right size and attach with glue. You want a good bond here, so first I used superglue, but I’ll be reinforcing them later since they will need to be strong to put up with lots of opening and closing over time.

Next, I reinforced the fixing with some brown paper and made sure this completely enclosed the straws at either side, doing this makes sure the straws don’t break off during use. use paper for this as card would be too thick and the nails would then be needed to be moved to accomodate the new thickness of the doors and space to clear it when opening and closing them on the finished model.

Dry fit the doors and check to see if they are working correctly. Lookin’ good!!

Since these were supposed to be heavy doors, I added a strip of card that would act as a sort of lock and only allow one way closing. you don’t have to do this, but to accenuate the doors and focus attention to the feature, I thought it would be good for extra detailing too. This will also hide any small gaps you may have if you have not cut right.


Clad the doors, detail them as you feel. again textured wall paper with a wood grain effect was used to clad the doors. Dry fit each time and adjust accordingly.

Detail was added with bits from my bits box to match up with the rest of the piece.


At this point I wanted some additional height, so spear ends were added to the top skull and the skulls at each corner. These were also from my bits box.

More detail added to the doors, this time using cardstock and nail art gems as heavy corroded hinges and fastening bolts. Do this on both sides to match up. A corroded rusty texture effect can be done quickly by using cheap runny superglue and flooding the area, and spraying with superglue activator.


Dry fit again to make sure it all fits and opens/closes correctly.


Once your happy that everything is fine, undercoat the pieces separately.

Paint it up the exact way as the first cemetery gates and so it’ll match the other dungeon stuff (that way it’ll all become inter-changable)


Use burnt umber or other browns to create a dirty old battered wood paint scheme for the doors, accent with gunmetal and silvers with ink washes to pick out any detail.


When finally done, fit your doors into the finished model and enjoy. Hopefully the doors will open and close easily and need no more alteration.


Ok, the model is now finished, so lets take another look at the finished piece in situ.

Well, I hope that you’ve enjoyed this tutorial and inspired you to attempt one for yourself, or even given you ideas for techniques to use in your own projects. Please comment, like and let me know what you thought.

I’ll be back next time with another Grim’s Dungeons of Doom with the next part that’ll show you how to construct these graveyard themed walls with railings to go with the build. See you next time!!


Another excellent tutorial. I really like the gate and obviously the fact that it can be opened. The detailing with bones and skulls adds that little something you want in your graveyard terrain pieces.
LikeLike
THANKS! I love integrating working features into models, and the nail and straw system has served me well on loads of them. Also, you might have noticed that I like skulls and all things skeletal (hence the site!) so, it was nice to finally get to stick them on everything!
LikeLike