

Every self respecting cheesy stock fantasy dungeon environment needs barrels? Right? Well, in this part of Grim’s Dungeons of Doom, I’m going to show you how to create whatever barrels you need for your games.
Me personally if I had loads of spare cash to buy my terrain bits, I would get lots of them, in all shapes and sizes, but why buy them if you can crank them out at a cost of mere pennies? Let me show you…. We’re going to have a barrel of fun….(Pic heavy…)
Before I begin, I’d like to say that these are really cheap to make (literally nothing bar glue and paint) and are created from easy to find materials that almost anyone can find laying around. Whenever possible I’ll be trying to find the most universal items for these tutorials, but if they could prove a bit of a problem to find, I’ll try to provide options that would work as an alternative.
Also, I’m going to show you not only how to make a normal common or garden barrel, i’ll be detailing different sizes, open barrels, spilled barrels, textured barrels and so on….
So, your going to need these things to make your barrels:
- Cardboard toilet roll tubes
- Cereal box card or paper
- Thick strong card
- Textured wallpaper (optional)
- Glue (PVA/gluegun/impact adhesive/whatever you prefer)
- Scissors
- Small beads/seeds/bbs or anything small enough to fill and spill out of your open or spilled versions.
- Patience!

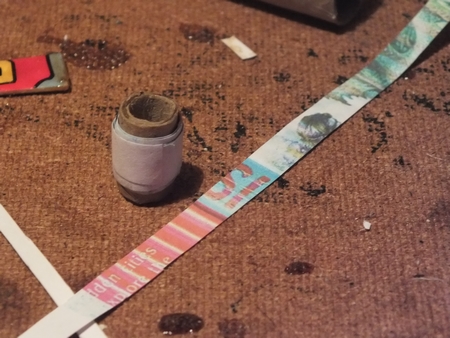
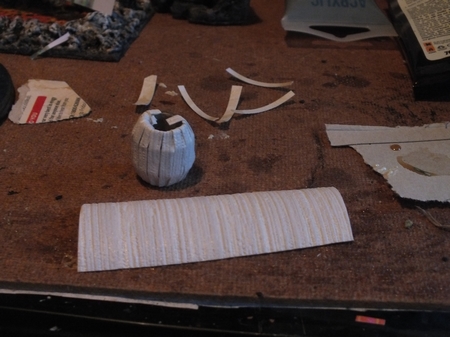
Start with your humble bog roll tube. It was about time I included them in some article so this was ideal for them. Anyway, cut the roll in half down the top to bottom to create to pieces like the pic below.

Now, re roll the pieces into thinner tubes. Use strong glue to create these bits. I used impact adhesive for this step, but it’s probably easier to get the glue gun out! i’m not one to rely on my glue guns, but this case is better on retrospect. Make sure its tight and the whole thing is sealed to form a nice thick roll without stray bits left unglued. Its especially true if you want to make the spilled and open versions as you’ll be seeing some of the inside on those versions, not so much on the standard closed ones.

Once you have them done, cut them into pieces to the height that you want the barrels. You’ll get about 4 normal medium barrels out of the pieces. For larger scale barrels make sure the tubes are a bigger diameter. These cut pieces will form the core of the model.

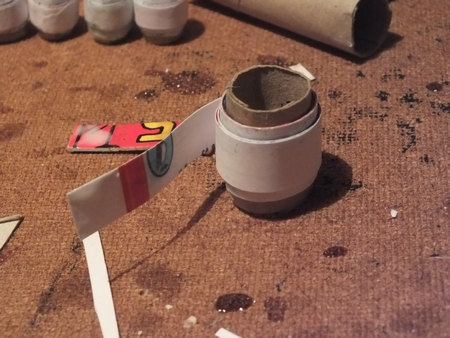
Take a core and cut a strip of cardstock to about 3/4 of the overall height of the core. This is going to start to create the curve of the barrel. Glue this to the core in the middle and wind around, affixing as you go (see pic below) These strips are a full A4 length or there abouts. (hey, I never measure anything if I can help it, trust me rough measurements are perfectly fine!)

Next, cut another strip, but now 1/2 size of the barrel core height. Repeat the process by glueing it in the middle and winding it tight, affixing as you go.
Your barrel core will look something like this after you’ve done it. (see below)


Again for larger barrels, you need a bigger and taller core. The principle is the same for any sizes but with differences. Large barrels will need 2 strips wrapping around for each (as its scaled up) Its up to you to decide how the bulge of the barrel is, but this ratio works ok, but your free to experiment!
For smaller barrels you can use paper & PVA for the lot (15mm scaled barrels) and forgo the card altogether. The method is the same, just scaled down, you needn’t worry about the lengths of the strips, keep them A4/letter length. Paper also gives you more control over the shape, but is much more fiddly.


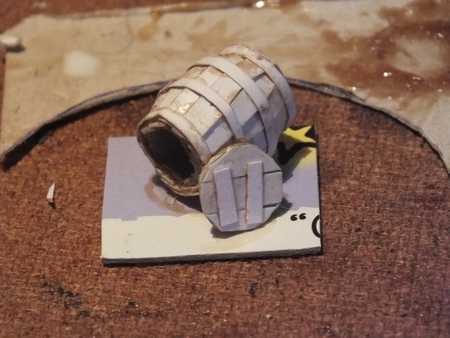
Your core is ready for the next step. Cut thin strips of cardstock for the wooden planked sides, again dont worrry about measuring (If you want to thats fine, I won’t stop you!) just make sure they are roughly the similar in size thickness.

Start to glue on pieces as in the pic below, leaving a small gap between each will give you texture and form later. Trim or even tuck in the ends. (trim if you want an open or spilled barrel, tuck them in if they will be closed)

Continue until all the core is covered. As you can see, the core with its layers underneath has now formed a curved shape to the barrel.


Now, cut more thin strips and glue them on to form the barrel metal strapping on the top, bottoms and two around the middle.


For the lids, Use the barrel to draw the size of the lid on some cardstock. Trim them to the right size and then take some more small strips to create a planking effect. You’ll notice that with this one I’ll need both ends capping, so I need to make two. If this were to be standing upright, I’d just make one (I affix these to a base, so no need for the bottom)

Stick the strips on with PVA, then trim them again to fit.


Stick them on. I also glued some small cross beams for a tad more detail on the smaller ones.

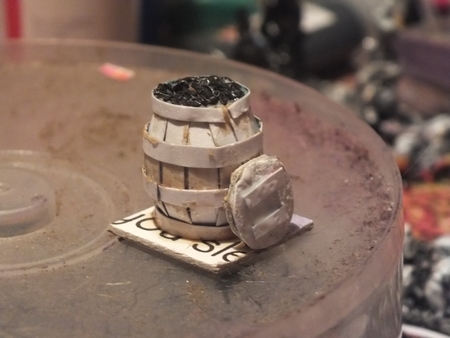
For this one, I’m making some barrel chocks as this one is full of grog, so I’ve got some rally thick card from an old kids card book. I can’t say enough about this resource, its great material to build stuff from.

When these are stuck to a sturdy card base, i added a small round bung cut from the same stuff. This will be the front. after it has dried I cut the base to the desired size. Other standing barrels are also based. You don’t have to do this but it saves having to weigh down the barrels as they don’t fall over and scatter like ones without. This is just my method (I base all my items like this, it keeps the tone and matches all my other stuff!)

This barrel (below) is going to form a spilled barrel. The bottom needs capping (same method as before with the strips and cross planks) but the top will be left open. You still need to create a top lid, but for now, you can glue this down to a base.

Again I used impact/contact adhesive, so both surfaces need coating with the glue and need to virtually dry before affixing. This glue makes a solid fix, but you could use your glue gun or even superglue if you liked.


Stick the now textured lid to a piece of the thick card. Glue the whole thing into position like the picture below.
Next, you will need the filling for your spilled contents. I used an old pack of seeds (Chives, I have hundreds of packs of chive seeds, so I went with them) You can use anything small enough to realistically fit into the barrel. Seeds, beads, bbs, micro beads, flock, gravel etc. Use what you have, or what you want to form the story about the piece. If you want apples, find something that’d look like apples, use your imagination. Liquid could be simulated by hot glue. Gunpowder by sand. Whatever you like.

Use PVA glue to affix your contents coming from inside the vessel. try and make sure it looks right so you may need to apply a couple of layers to get it to look natural.

An open barrel is done in a similar way, glue to a base, add a lid propped up to one side, bung up the top of the barrel by hot glue, then PVA your contents. Easy.
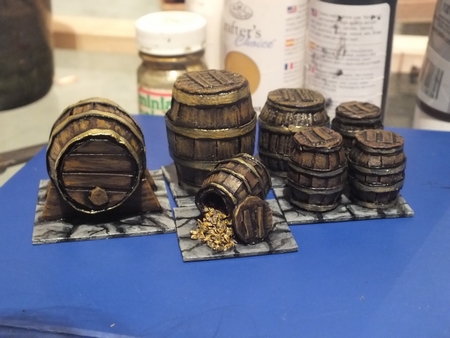
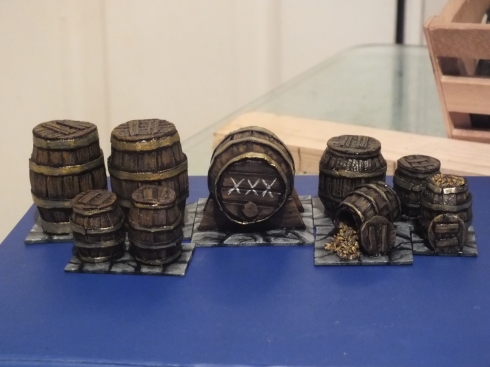
You should now have some barrels ready to paint up. I opted for different sizes, but again you can make whatever variations you need.

OK, before we carry on, I want to show you the textured version. I’m aware that a lot of you out there are possibly having some trouble getting hold of textured wallpaper samples like I’ve been going on about in the walls and floors tutorials. It seems like those of you especially in the US are finding it difficult to get hold of. From what I’ve seen, there do look like a few of the hardware/DIY stores will give out samples, but you have to order them and then pick them up from the nearby store, so you may be able to get it that way, or possibly approach wallpaper manufacturer directly. I won’t stress at just how great a resource textured wallpaper is for model/hobby builders, if you can, get some.
This version on the theme, uses textured wallpaper. The one I used has a faux wood grain look. perfect for adding another layer of easy detail.
Make the cores as before, this time though, use thin strips of the wall paper to build up the plank outer edges, just the same as the card strips.

Finish the textured barrel, by adding the strapping. Textured paper can be used to form the lids. It saves time and looks great when painted.
Well, now you should have some barrels all based and ready for an undercoat. Use your normal method to undercoat them.
Use a base coat of dark brown for the wood, shading up with mustard colour (If you want them to match my scheme) but use whatever wood colour effect you like. Paint the strapping in silver/gold/brass (I opted for gold here) again, it’s your choice, I’m not here to show you how to paint!
Paint your bases in your chosen style (You’ve seen my dungeon scheme, grey, so that’s what I opted for)

The contents of the spilled barrel and open barrel were painted in the mustard colour as I had it to hand, but use what you want.
Finally, the huge Grog barrel was given XXX markings to finish it off. See, wasn’t that difficult was it? I think the finished product looks pretty good. What is better, they actually cost just the price of the glue and paint used. Card was all free, so probably less than 50p (that’s around 80 cents or so) to make all of them. It beats paying money anyday!!
Well, I hope that you like them. I will warn you though, they can be a little time consuming, but once your on a roll (barrel roll, you get it? sigh!) they come together easily.
Perfect for most games, RPGs, Frostgrave, Flintloque, Warhammer, AoS, in fact any situation that calls for barrels!
Let me know what you think, leave your comments below and share this article with those who might find this info useful!
I’ll be back with another Grim’s Dungeons of Doom article soon…


Brilliant work!! Love how miniatures can be made from things we have around the house!!
LikeLike
I’m stunned. Can it really be so easy to making wooden barrels with your own hands? Unbelievable! They’re looking so amazing. Superb Work!
LikeLike
OMG, these are AMAZING! thank you. Just bought a LOTR Journeys in Middle Earth board game and will replace all those flat tokens with the DIY stuff! Thanks Grim 😀
LikeLike
Thanks for your comment! No problem, glad you enjoyed the technique!!
LikeLike
Absolutely brilliant tutorial. These are so good. Well done. 👍👍👍
LikeLike
Thanks! Hope that it inspires you to have a go at making some!!
LikeLike
I just made a larger barrel to go with my son’s pirate ship. Not painted yet but already looks amazing. Instructions were clear and pics helpful. Going to do a couple of smaller casks for gun powder. Thanks for the tut. :0)
LikeLike