


Back again with more tiny furniture for your own Dungeons of Doom. This time we are going to tackle bookshelves. Again, this is not a hard thing to do, and does not require lots of time, money or effort. As well as the tables we talked about earlier, these beauties are ideal for showing off the books and items found in the free PDF (as you can see in the pic)
On a side note, it’s been mentioned to me that this is virtually the same as making dolls house furniture. Well, I agree that the skills you need are not too dissimilar, although it’d be a case of scaling things up, so you’d also need to change up the materials somewhat as well. When I start making things of that nature, I’ll let you know!
While we are going to deal with bookshelves in this article, this build will be slightly different in that, this one has a built in bottom cupboard. There are many other articles and videos that detail basic shelving in 28mm, so I thought I’d do it slightly different and throw it out there. The principle is the same in construction if all you want is basic shelves (but I’ll tell you later in the article) as are different sizes and shapes, all you need to do is follow the formula.
Anyway, lets get started with the things you’ll need for this build.

You’ll need lollysticks, cardstock, glue (white, contact adhesive, superglue) EVA craft foam, your books, scrolls and maps pieces from the PDF and additional oddments or bits to add to the finished shelves.

First, take your lollysticks and cut three identical lengths to form the bottom, and middle shelves, and another two identical pieces to each other that will form the sides. It’s up to you how wide the shelves will be on your build, just ensure they are the same. The two sides will dictate the rough size of the unit, so again its up to you.

Assemble the rough frame as above and affix it directly to a piece of cardstock. I used Contact adhesive, but PVA or even superglue would do.

Cut another piece of stick to form the top, and attach to the piece. Make sure it overlaps like the pic, dont worry about it being uneven or too big, you can trim the sides later if required.

Take a piece of cardstock cut the size of the bottom shelving area and glue it on. If your making a plain shelf, leave this step.

When dry, cut out the piece from the card, trim it up, and add a bigger base to stabilise it when standing up.

For the bottom cupboard detail, take some more card and start glueing on thin strips of card, leaving a millimetre gap or so. Dont worry about the uniformity, as long as they are roughly similar to the pic, it should be fine.

For the back, again glue on strips to form faux planks. Trim off the excess when dry.

Trim the cupboard piece to size, and attach it to the bottom at the front.


Take two thin strips of card and cap off the top and bottom of the cupboard area.

Cut two small hinge shaped pieces (like the ones used in the chunky doors article and opening doors article) leave a gap as in the pic, you’ll be adding more detail capping bits later.

Next, take some EVA craft foam and cut into small varying shaped rectangles These will form some stacked books on the shelves. Glue them in, but remember to leave plenty of room to add other stuff you have and the books, scrolls and maps later.

Next, cut a small cardstock lever catch arm shape, glue this on at a similar angle to the picture shown.
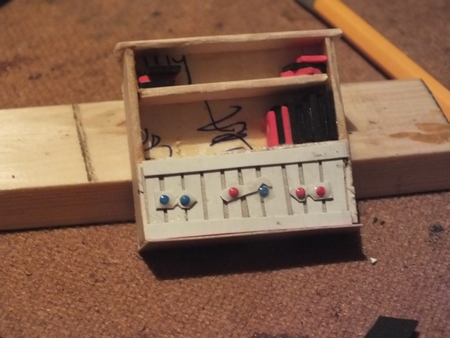
Take some nail art embelishments (found cheaply on ebay or similar) and add them as the studs of the hinges and catch.

Take a drinks straw and cut a few small bits to make beakers/cups. Add them to the shelf (totally optional)
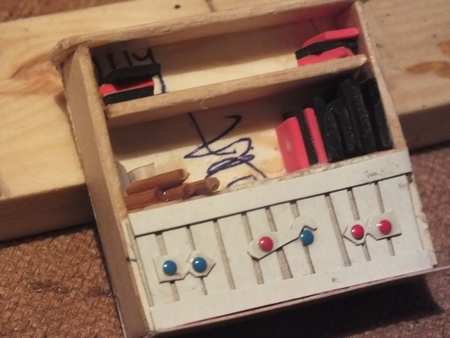
I added a few thin wood pieces, stacked them up and glued them on too. Again these bits are optional, So if you have bits of your own (like weapons, items etc) add them now unless they are already painted, as you’ll need to paint them along with the main unit.

I then took some thin wood strips and added some more trim detail. its up to you how much, just that its there to hide any edges and neaten them. Also it adds a bit more raised detail, as plain shelving can become a little repetitive. I also added another lolly stick piece to the top to make the top fill out more symetrically.

BLACK BOMB!! Yes, get undercoating to the finished unit.

Brown base coat applied. You can use any darkish brown colour you wish.

Paint in the wood shades until your desired effect is achieved.

Next, paint in the books. Use a variety of colours of your choice. Add small bands and a thin white/yellow strip to simulate the paper edges on some. Also paint in the hinges and catches black to prepare them for more detail later.

Paint in the catches and hinges using whatever metallic shade you prefer. Also use the same to paint the cups on the shelf. The strips are painted as scrolls/candles (they are quite ambiguous) by using light brown up to white. Don’t forget to paint the base to match your decor too!

Take your books and items from the PDF. Add them as you wish to create more detail.

At this point, I added a white skull bead (from ebay very cheap) and superglued it on the shelf. These are the howlite ones, so need fixing securely. Add some Nail art embelishment jewels to the eye sockets to make the skull stand out and sparkle!

You should now have a nice detailed shelving unit, fit for any dungeon or gaming interior or game. These are easy to construct and are much cheaper than expensive resin pieces. Vary the widths and sizes to create other units with variety.

Well, thats all there is to it, and I hope you get chance to make some yourselves. I’ll be back next time with a basic beds make.


These are truly excellent Wil, I can see I’ll be returning to these once I’ve got a bit of time on my hands.
Keep it up Sir!!
LikeLike
Thanks Roger, these models are amongst my faves of the lot of the build so far. I’ll probably be doing a version of the walls made from shelving too, for libraries and such like, but next up is the basic beds tutorial (single & Double) I want to get some other basic stuff done first before I start mixing it up a bit and doing more complex components!
LikeLike
Excellent result and very clear tutorial. I think with plasticard or rounded plastic strips you could built it even faster as all the planking and woodgraim can be carved in.
LikeLike
Yeah, if you needed more detail theres loads of adaptions you could do, its up to you how much extra effort you want to put in to achieve another level. What I like about cardstock is that its everywhere, free and available, and pretty much everyone can have a go at trying something similar without too much effort or time. i find myself these days with a lot less time than ever, so I’ve been more concerned with finding out cheats and shortcuts that still look good, but dont require as much time as I’d like to spend detailing the way I’d want it normally! I’d like to just sculpt them all, just too busy! 🙂
LikeLike
More awesome dungeon/goth doll furniture! 🙂
LikeLiked by 1 person
I might have a go at that sometime!! 🙂
LikeLiked by 1 person
Very impressive. If I ever get a clear break between projects it’s the sort of thing I’d like to do some of, and you’ve created a great guide here.
LikeLiked by 1 person
Thanks Azazel, I’m hoping that I’ll not only help other in making their own dungeons, but keep me focused on the overall planned build!
LikeLike