Tag Archives: broken toys

Terrain Workshop: Ruined Houses (part 2)

8 Jul

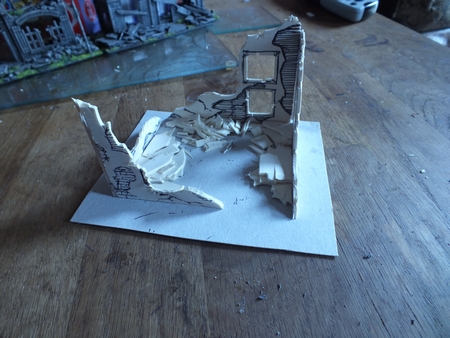
Following on from the last post, in this part, I’m going to show you how to create a really easy, companion set of ruins using a few waste materials that one might have on hand. From this:
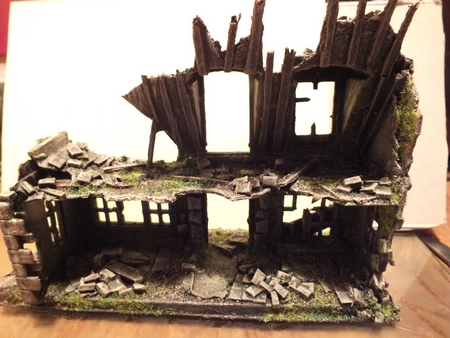
DSCF2626

To this:

S0042664

Lets get started.

The foundation of this model is balsa wood, taken from a horse wooden model left over bits. I bought it for my daughter, and she was kind enough to let me have the leftover wood. If your a regular to poundshops and the like, most have them or something similar. Here’s the model used, just so if you want to do the same (Any of the cheap wood model sprues should do):

mf89n0f3vjAOTHjuKSfZeDw

After you’ve made the model, you’ll be left with some wooden sprue that held all the parts, to be honest, its pretty scrappy poor quality wood, but since we’re making ruins, it will be more than adequate for our needs. As you’ll see, the kits are actually punch printed sheets/boards, and have perfect (ish) 90 degree angles at each corner. These corners are the starting point and you’ll need four of them (2 for each ruined corner) Choose the best looking ones, ones that look as if you have some form of window or door opening if possible as it will save you time if you don’t have as much work to do on them if they look like what you need. Sure you can hack it up as you see fit, but this way you don’t have to.

DSCF2627

Since the wood is soft, you can get a biro or stylus/pencil and begin to make textures on the surfaces of each side. You can push down into the wood to provide detail to the plain walls, adding brick and slats that you can drybrush and highlight later.

DSCF2628

DSCF2629

As you can see, you don’t need to be neat or to pecise, nor do you need to measure (unless you really want to), You’ll need two complete corners, so do another set in the exact same way.

DSCF2630

Stick the corners down to your thick card base (or what ever base your using) and leave to dry. After that, its time to start building up your layers of debris. you can use the rest of the wood sprue for this, just break it up into useful looking shapes, blocks and planks with a strong pair of snips, knife or scissors, and slowly layer it up to form natural looking piles, maybe where a ceiling or internal wall has fell down, its really up to you how you want to do it. Remember to leave some areas for your miniatures to hide in the model during play.

DSCF2631

DSCF2632

DSCF2633

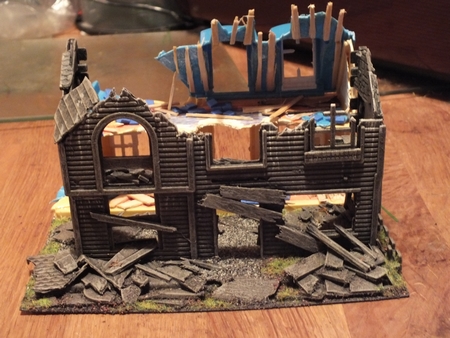
The next stage of the build, I wanted a bit more detail to what could essentially be quite a boring model, so I got a dried stem from a bunch of grapes (I always keep these and dry them out as they are very strong, as well as being a dead ringer for blasted or dead foliage) Using milliput to create the base of the tree, I added it to one corner, as well as a bit at the side. More putty was added for additional bits, and more layers of debris were glued on along the edges.

DSCF2634

DSCF2635

Now, I’d like to mention back to our freebie craft material, artificial grass, which if you remember I used to produce the field in a previous article. This stuff is a really useful and versatile material for making terrain, this time I was going to use it to add wild tufts to the model.

DSCF2636

DSCF2637

DSCF2638

As you can see, you can easily cut it up into strips due to it being stitched on to the rubber base, then each turf can be cut to whatever size you desire. These are then glued down using impact adhesive to the model.

DSCF2639

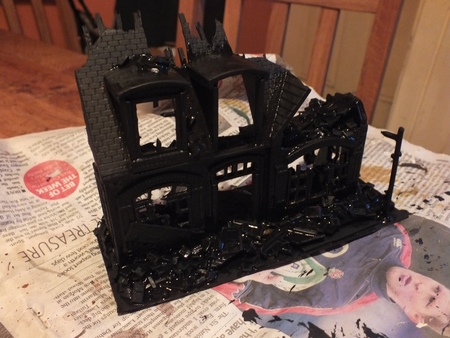
All that is needed now is an undercoat and finishing in the same manner as the other ruins so they will match up.

DSCF2640 DSCF2641

To finish up with the model, a mix of the usual green and grey and brown flocks, plus grey ballast and a little static grass brings more life into the piece.

DSCF2665

DSCF2666

DSCF2667

DSCF2671

DSCF2673

DSCF2674

DSCF2675

DSCF2676

DSCF2677

DSCF2678

DSCF2679

DSCF2680

DSCF2681

DSCF2682

DSCF2684

DSCF2687

DSCF2688

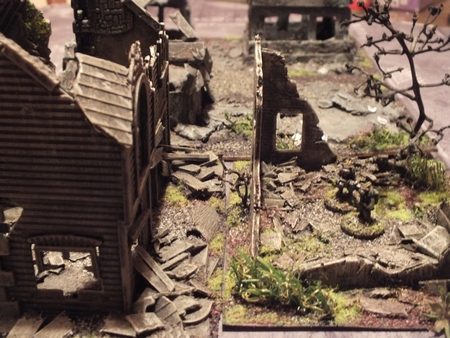
You can see all the ruined buildings from both posts, fit together great, best of all they cost nowt (Just the cost of glue, flock, paint, milliput etc) I hope that it inspires you to create some post apoc battlescapes for your own projects, and hopefully will save you a few dollars or pounds in the process!

I’ll be putting more projects up soon, which I’m planning more ambitious builds, not that I have anything against fields or ruins, they are just a little basic and I feel the need to do something a bit more challenging!!

As ever your thoughts, questions and comments are welcome!

Peace out….


Enhanced by Zemanta

Terrain Workshop: Ruined houses (part 1)

6 Jul

DSCF2679

So I thought I’d share some stuff what I’ve been up to for my 15mm gaming, if you’ve read my other articles previous, then you’ll know I have plans for a totally ruined board for post apoc, zombie, and modern gaming purposes, and since I was in scratch building mood I’ll try and talk you through how I got from A to B.

I have decided to split this post in two, so that I can concentrate on hopefully giving a few of you out there some pointers to easily replicate the same results as me, just with minimal time and effort. There’s plenty of pics for you too, as I kept my camera close by as much as possible this time.

Since I have a regular toybox purge every few weeks just to make sure my little ones aren’t harboring any potential nasty broken toys within. With them being 3 & 4, they tend to find all sorts of junk or smashed items and stash them away, so with their best interests in mind, I get access to all sorts of great broken bits to make stuff from! This first part deals with a small trashed plastic dolls house.

Ok, the one thing I didn’t manage to capture was the original state of the smashed up dolls house, the roof was missing, sides were snapped, windows loose, along with a huge split in the centre. My girls still wanted to play with it, but like I said before, it just wasn’t safe anymore. On a side note, I got these for them from Poundland last year, scaled for about 15-20mm, I wish i had had the foresight to buy a few more of them when I had chance, I haven’t seen them available where we are, but seriously check out your local poundshops for the possibility of getting some in your locality, they are extremely nice models to use as a starting point for scenery (and you can link 2 together to form a full house, but more about that in a moment…)

The next thing I did was try and reconstruct as much of it as I could, sticking the roof back on, fixing the split etc. You might as why I was doing this considering that I was making it into ruins. Firstly it needed to be stuck down onto a suitable base to work on, and secondly the roof I felt, needed to be put back to make sense of the angular shapes atop, it just didn’t look right without at least part of it. Next, I began to deconstruct the house to my asthetics, hacking into it with knives, cutters and snips, to create more natural looking damage, not just angular splits and bends. When this was done, I began to build up extra damage, detrius and rubble, which brings us up to here:

DSCF2572

I added such things as a damaged lamp post made from sprue, lots of broken lollypop sticks, balsa off cuts, plastic that had been hacked from the model, the blue squares are craft foam bits my daughter gave me (also from the poundshop, in a pack of kids craft bits, which I have to say, are really useful as they are self adhesive so they stick down pretty well without glue (I still glue them down though, just to make sure!))

DSCF2574

On to the rear of the property…again I started to build up layers of damaged flooring, tiling and so forth. Split balsa was glued into position on the inside of the roof section to simulate supports. If I had had more time and inclination I could have added more layers of detail, but since these were just ruins, it didn’t matter too much.

The pictures below are to illustrate a few points, firstly you might have seen the first broken house I liberated from the kids a few months back, exactly the same size and type, just different style. You’ll notice that back to back they form a full building, so that was my plan to match the colours as best I could, to provide more options for gaming with different combinations for setup.

DSCF2575

DSCF2576

DSCF2577

DSCF2578

DSCF2579

DSCF2580

I know I said I wasn’t going to add too much extra stuff, but yup, I did and added more! As you can see extra bits of craft foam off cuts and trash were stuck down.

DSCF2605

DSCF2606

DSCF2607

DSCF2608

DSCF2609

DSCF2610

DSCF2611

DSCF2612

DSCF2613

DSCF2614

DSCF2615

It was just about ready now to give a few undercoats with a mix of black and earth brown acrylic. A few coats were vital to make sure that all the gaps were covered especially when layering up lots of small bits, as gaps can cause annoyance, particularly when you want to get on with the subsequent steps.

DSCF2616  DSCF2617

Next, when it was dry, it was the job of drybrushing the model with shades of greyish brown, from almost black to lighter grey, as best I could to to match the other one.

DSCF2618

DSCF2620

Finally I highlighted it with light grey brown and a bit of white, here and there, just to make some of the edges stand out and look  weathered.

DSCF2621

DSCF2623

All thats left at this point was to add a bit of grey, brown, dark and mid green flock, static grass, and model railway ballast, on all the surfaces, levels and floors. Even a slight sprinkling of static grass was added to the side and roof to signify a bit of mossy growth after years of abandonment. Here’s the finished piece.

DSCF2624

DSCF2625

Not a bad if you consider that it was destined for the bin! Total cost for the build: £0, since I had all the extra materials in my supplies. I could have spent money on getting the needed parts, but what’s the fun in that?

Next time in part 2, I’ll be showing you how to create a matching ruin terrain piece, just using some off cuts of balsa, card and a few no cost odds and sods! (Plus there’ll be another appearance of the very useful artificial grass samples too!)

Peace out…

Enhanced by Zemanta