


Today’s Grim’s Dungeons of Doom tutorial is another dead easy one, level riser tiles to elevate your dungeon to a higher level! These simple to make tiles will add an extra dimension to your set ups, and will create much more options when making your set-ups.
All you’ll need for this structural addition to your dungeon set up is some cardboard boxes, cereal box card, other assorted discarded boxes, glue, textured wallpaper, lollypopsticks or other wooden type sticks (both optional), plus paint for undercoat and finishing.
Ok, up till now, the Dungeons of Doom system of 28mm dungeon building has been reasonably one level and sort of flat, which is fine. It allows a decent array of dungeon layouts and keeps the plane of vision pretty clear for all players at the table. But what happens if you want to go up a level (or indeed, go down)? You could always have a flat stair way that leads to another set up elsewhere on the table, but for a 3D dungeon, it still is pretty flat and needs some added dimensionality to create a more true 3D look. (Well for me anyway!)

Level riser tiles are a simple way to elevate the board upwards to simulate a variety of set ups. they can be used as separate levels or rooms, both in indoor and outdoor settings. They are cheap and easy to make a set for yourself, and will expand your dungeon of doom set further. Lets get started.

For the large risers, we are going to need some medium sized cardboard boxes, these must be in decent order with minimal damage, and all four bottom corners undamaged. There is no limit to the sizes of your risers, just don’t make them too big to use (make them useful and interesting rather than too large) You’ll only need to use the bottoms of these boxes, so use the measurement of the exact same size of the height of your wall sections for the rest of your dungeon. This is an important convention in the whole dungeons of doom system that allows all the other pieces to fit nicely together, whatever the set up. As you can see from the above pic, I used a spare piece of wood that I have which is the same dimensions as my walls. Measure a line around the bottom of your box and cut it out from the rest. Essentially, this will form the basis of our riser.
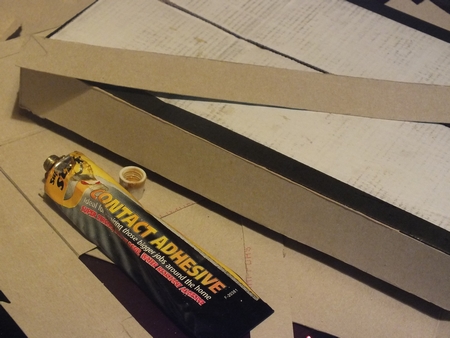
Now, take lots of cardstock and clad the top, and sides of the box. This will help to even up and straighten the riser, as well as adding more strength to the riser. I dislike corrugated card as a material in general, but when clad I can overlook the stuff. you can skip cladding, but I recommend doing it for your largest pieces simply to make sure the sides and top will fit any wall sections or additions to the set. To get a good solid fix of the cladding, I used cheap contact adhesive, but you can use what you like, but if using PVA to glue the cladding, use sparing as corrugated cardboard is prone to warping if there is too much moisture. You have been warned!! (thats why I tend not to use the stuff!)

Once cladded in cardstock, use the wall section method to clad the sides (and top if you like) in the same style as your walls. If you don’t know what that means, check out the article here. The top can be clad again using the dungeon floor method from the earlier article by using textured wallpaper. If you can’t get it, use the simple wall section method.

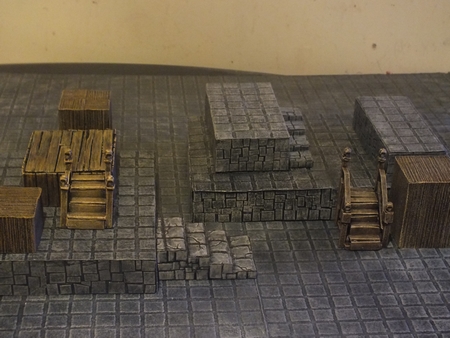
Undercoat and paint to match the walls and floors and you should have something that looks similar to these. That is pretty much all there is to it. Alternate methods of cladding can be used, feel free to experiment, but try and keep your stuff matching or it may not look right. If you create different cladding, try and create a set of similar risers, this way it won’t look as odd. The set below are examples of a different take on the theme. Wood effects were created with a different textured paper and wood.

As you can see, this set is smaller, made from different assortments of card boxes. They all are done the same way as the bigger types, but generally are just hollow boxes cut to size to match.

These here were done at twice the height, and treated the same way. you can make even bigger sizes, just make sure you keep the wall height in multiples so the pieces fit (So, go for 1 x wall height, 2 x wall height, 3 x wall height etc)

This riser is clad in chopped up lollysticks. This is among my faves for sturdiness, also matches well with other aspects of my other pieces. If doing this, try snapping a few of the planks into bits to resemble uneven wear and tear, and will add more character to your pieces.

Ok, now you have a set of riser tiles for your dungeon, so now I’ll show you a few examples of these in practice. I’m going to build a simple set up using them in tandem with all the other bits so far, just so you can note the differences in how you can create new ways for your tabletop.

Place down your risers on the board.
Added stairs to link up the various levels (I’ll show you how to make these next article.)
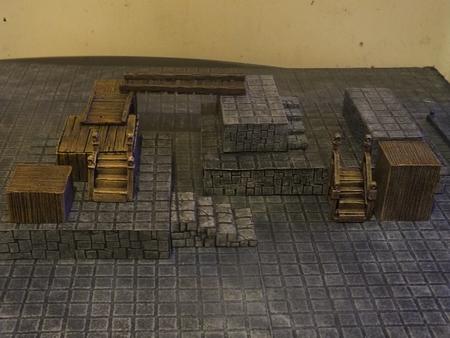
Added wooden walkways (Again, article coming up soon)

Added, Wall sections and the odd door or two.

Added, props like Bookshelves, Barrels, provision marker and chest. (Treasure tutorial forthcoming also!)

Ladders are added for more access to higher levels…

Add some critters and now your getting the idea! You can add whatever you like, using the risers as either platforms or rooms by using the positive and negative space around the pieces.
Other set ups can be made in minutes by changing around the bits, taking them away or adding new ones. the new one below was made from the foundations of the above one in a couple of mins, adding a bar to create a tavern, besieged by some goblinoids and a troll!

All in all, Level risers are a great addition to your Dungeons of Doom set, The cost is very low and overall it will expand your dungeons that can be achieved from the flat one level, to all manner of situations. It’s sometimes hard to believe that the only things that weren’t handmade in these pics, were the miniatures, the door (above, available from irregular miniatures) and the reaper bones candelabra!
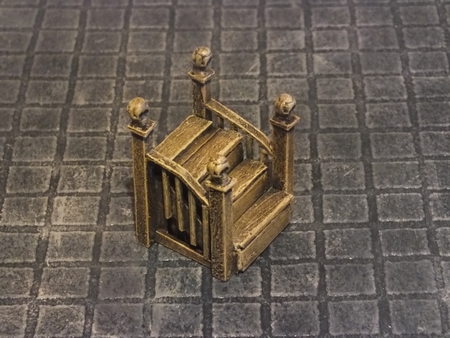
Don’t worry, we’re not done with components for Dungeons of Doom, next time we will be making these nice creepy old wood staircases, very scooby doo!!
Join me next article for more Grim’s Dungeons of Doom, and don’t forget to show your appreciation by commenting, sharing and telling others who might be interested in this series. See ya next time…


I’m transitioning my dungeon tiles from complete rooms and I’m trying a few different ideas. I hope you don’t mind me picking your brain to see what direction is going to work best for me.
How well do you find your system working when you don’t start a campaign session in the dungeon? How long does it take to set everything up when you can’t lay things out ahead of time?
LikeLike
No problem, Set up is very easy since the pieces layout very quickly. I can have all the bits ready around me before I set them down, which takes literally minutes if its a simple one, slightly longer for a bigger or more complex one, or even longer for really complicated stuff, but I can set up a detailed dungeon with at least 6-7 encounter areas in no more than 5-10 minutes.
I’ll be exploring options with using the system with outdoor terrain additions like building fronts, cave & dungeon entrances, exterior castle additions and such, so it’ll be easier to transition from one to the other, and obviously simple pre-existing standard terrain you might have already have (trees, foliage and general wargaming stuff)
But yeah, its pretty easy providing you have the correct amount of each piece to map out what you need, it’s pretty good.
I hope that kinda answers your question (feel free to ask anything else if you want to know, or I’ve missed something!) 🙂
LikeLike
I’m starting to think maybe my problem with setting up my dungeons quickly must be my lack of tile organization… If it is that easy to set up, I’m going to make a ‘sampler’ of your floor/wall style to test once I finish with this iteration of some test tiles I’m working on. I appreciate the help!
The way you do walls and the textured wallpaper floors are pure gold. I managed to find some amazon textured wallpaper samples.
LikeLike
Cool! 🙂
I have to agree that organisation and preparedness are key, pre-planning what you need and maybe keeping a rough (or detailed) set of notes might be a good idea too!
As far as textured wallpaper goes, I keep meaning to write this list up in an article, so I’ll post it here so it could be of help to you possibly (if your in the US!)
Walls republic http://www.wallsrepublic.com/How-to-Order-Wallpaper-Samples-s/2010.htm
Up to 5 free samples can be ordered here, I hink its mainly 2d and not textured, but there are some
great looking ones that would prove useful for terrain projects (loads if your into general crafts!)
Magic murals- http://www.magicmurals.com/free-sample/
Ok, so not exactly wallpaper, these are giving free Mural samples, these could have implications for
modelbuilders like us, so could provide useful (being as I’m in the UK, let me know if this sample
was any good!)
WallUSA- http://www.wallusa.com/
Appears that these offer samples for free (in the US), contact them directly to ask by the looks, be polite and
you might get the motherload!
Graham & Brown- http://www.grahambrown.com/us/info/how-can-we-help/wallpaper-samples
Up to 4 free samples here (8.5” x 11” sized), $2 each there after. Free delivery on samples too.
Wallpaper Direct- http://www.wallpaperdirect.com/us/brands/anaglypta
Free samples and free shipping in the US. This stocks the kind of stuff I get my hands on, including
the type I used in the cavern features article (its called popcorn here)
Let me know how you get on with these links and samples!!
LikeLike
That is a wonderful idea. Really adds flexibility and interest to a single level dungeon. I shall think of this when I plan out future modules for my project.
LikeLike
I was getting a bit tired of the flat overlook of my system, so this seemed a good and cheap option to “level it up” so to speak! It’s worked out pretty well with being able to integrate outdoor terrain elements (like castle towers/turrets and parapets etc) to create more options for situations too!
LikeLike
These articles just keep getting better and better Wil, I’m going to be having a go at some Frostgrave scenic’s in the new year but you’ve just made me have a serious re-think about how I’m going to do it!l
Cheers Roger.
LikeLike
Nice one! Hope you’ll share the pics when your done!!
LikeLike