


Well, here I am again, with a later than scheduled terrain making post, I know it’s been a while, but haven’t had much chance to do much with a PC for what seems like ages.
So, while not fitting the whole dungeon theme entirely, we kick off this belated Grim’s Dungeons of Doom article with a set piece that is ever present in stock fantasy games, The Tavern bar. This’ll be first in a series detailing how to turn your modular dungeon scenics into more than just an underground lair, and lets you turn the system into a viable way to simulate entire buildings and interiors. These new pieces need no more skills or techniques other than what I’ve already shown you, and we’ll refer to other articles in the series for the “how to’s” to specific parts of the build.

Ok, for this build, your going to need a base. I’ve used this very thick card packaging part from a washing machine. it’s perfect for this project, so if you can get some, then use it. If not, you can use any thick card glued together to form a right angle L shape. If you use this stuff, you’ll need to cut it with a saw as it’s really hard to cut otherwise. The size of this is almost the same as my wall sections (slightly over) but it’s near enough for me. Cut a section large enough to accomodate your bar.

Now construct some shelving directly onto the back of the piece (shelving tutorial can be found here) construct as in the shelves article. Do this first, as the width between the start and end of these will dictate the bar opening later.
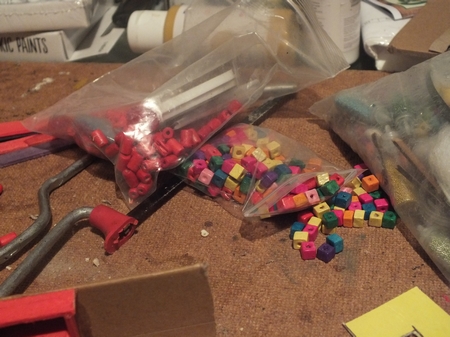
Next, you’ll need some beads for embelishment. I like the wooden types best, but these will be used to decorate the front of the bar as well as the various beakers/cups on the shelves.
Using thick card, cut out the top of the bar. The size should be dictated by the size of the shelves, and also the size of the base. Also, remember to leave a gap behind the bar (I’m planning on adding a barkeeper at a later date!)
The front should be cut also (which will be as big as the front edge of the bar top) make sure that your bar doesn’t rest too high when doing this. The side pieces to fit the gaps at the side can be cut out at this point as well, put them to one side for now, and get out your beads and start to decorate the front as you wish (you can use whatever you like to do this, I just used beads and off cuts of thick card)

Here I added a small strip of card to even it out and make the fit better. Get creative in the design of your bar! When your satisfied with it, start to stick the top to the the bottom,, but don’t stick the bar section to your base just yet.

Keep dry fitting the pieces as you go, to make sure you get a great fit. Add the side pieces and trim accordingly.

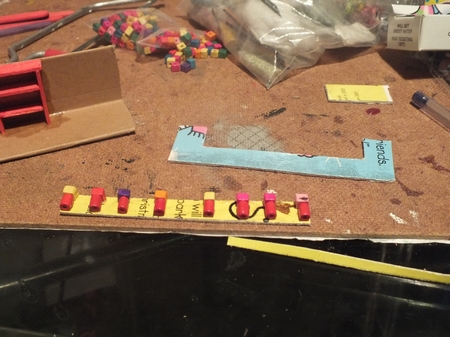
Now, you’ll need the beads again to fill the shelves. Use superglue to affix the beakers and boxes to the shelving. Also add a shelf between the two main ones (this is used for mounting the bottles behind the bar)

While that’s drying, make some barrels (as in the tutorial for barrels) and create a strip of bottles (as in the provisions tutorial) mounted on a strip the same size of the middle shelf. This piece was created separate to make sure all the bits could be painted properly, but if you lazy, you can add them directly.

I added some textured wallpaper for the top of the bar, this adds loads of easy detail and simulates a wood look. You don’t have to do this, but it adds lots to an otherwise plain area. Alternatively, you could use balsa or lollypop sticks to get a wood effect on the top.

Again dry fit, to make sure all the bits are the right size on the base.
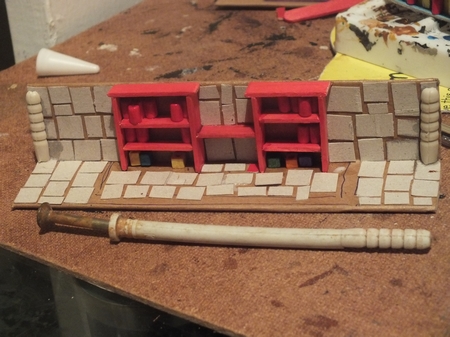
Now, detail the walls and floor just as the Wall sections to match the rest of the dungeon pieces (See Wall sections tutorial) make sure you leave the area underneath where the bar fits to achieve a good fit when it comes to glueing. Don’t forget the back of the piece too. Add some end caps for interest by cutting the end of a wall plug in half.

Create a bottle and goblet on a tray the exact same way as before (Provisions article) that will sit on the bar, as well as some loose bottles and a few tankards for dressing.

Add the various components and glue them all down (apart from the bottles at the back)

Now spray undercoat the lot.

Paint up the piece to match the rest of your modular bits (Gray for the stonework, wood shades, silver for the cups, gold for the banding on the barrels and goblet etc) Bottles are done as in the provisions article. You can use the same technique for the labels, but this time, I opted for using printed labels. I used the printouts from the books and scrolls PDF, and cut out small labels from various elements on the sheets (If you haven’t got the PDF, it’s free!!) Carefully add these small elements to the bottles (its tricky, so use a pair of tweezers)
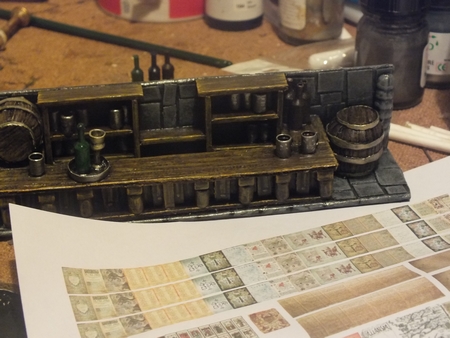

I added a few candles for effect (Torches & candles tutorial coming soon) and also some other elements from the PDF on the walls as noticles, and thats about it. Your piece is done.


I’ll be making more tavern features (Tavern front, stage etc) in future articles and ways to integrate them into the rest of the modular set. As ever, feel free to comment and post your own versions that you might come up with using any of the methods detailed here!


Looks beautiful. Excellent tutorial, too. The steps are very clear and the result is stunning. I especially like the bottles. They really add that touch of realism to it.
LikeLike
Thanks!! I thought it was about time I did one that was a little more involved rather than basic structural (like walls or floors) but still pretty easy for anyone to follow if they want to make one for themselves!! I’ll be following it up with the tavern front and other bits!! (Not next though, there’s bone piles/respawning markers and others to come before that!!)
LikeLike
Superb as always sir!
Cheers Roger.
LikeLiked by 1 person
Thanks mate! 😉
LikeLike