


Welcome to another Dungeons of Doom article, my attempt to cover pretty much every aspect of a modular dungeon build for 28mm dungeon crawling skirmishes and RPG. Further along with the furnishings of my dungeon build, as promised I’m taking on the subject of more 28mm furniture this time in the form of beds. Every mini dungeon should have some, don’t you think? it can easily set you back a fair few quid buying metal or resin versions, so why not just make some? These are easy compared to other stuff you might come to make for a project like this, so lets get cracking!
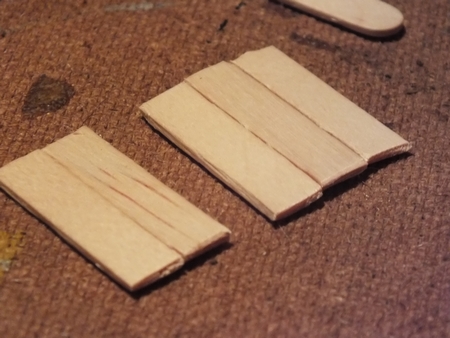
The build starts with our friend, the humble lollystick. As you can see above, I cut two pieces for the single bed, and three for a double version (just in case any of the dungeon denziens ever want to get jiggy!) Affix the pieces together to form the base. I used contact adhesive, but you could do as the tables tutorial, with a piece of card underneath if you prefer (whatever works for what materials you have) Measure if you want, I usually do as much as I can by eye, as I am lazy!

Next, cut a further two pieces that’ll form the head and foot boards. (They should be slightly smaller than the width of the bed frame) Glue them on.

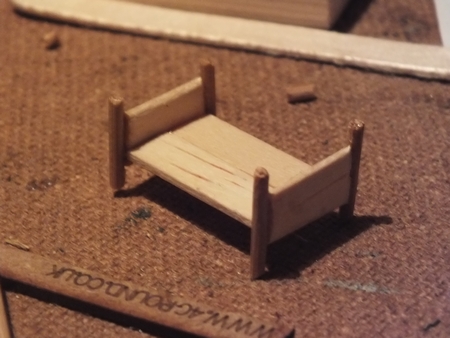
Take some thin skewer type sticks and cut four lengths per bed to form the legs. Glue them on. Also don’t worry too much about how they sit flat, you can trim them later when everything is dry.

On the single, I added a small piece of EVA foam to simulate a mattress, and a small square for a pillow. (So that it’d bulk out the next bit.)
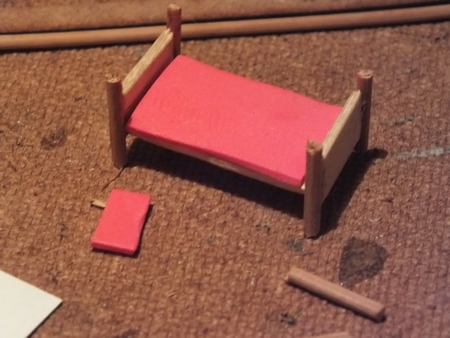
The Double bed skipped this step and I added a thick blanket instead. This blanket was made from some scraps of material taken from an old ripped sock (A clean one, not a smelly old one!) Most people I’ve seen doing similar beds have used toilet paper, but I opted for real material so I could capture some detail in the weave. The material was saturated in neat PVA before adding. Add more PVA if required to tidy up the scrawny edges. Leave to dry.

On the single I added a blanket in the same way using the material in PVA. Make it form creases by manipulating the piece as it starts to dry.


Form pillows by taking small rolled up scraps of the same material and adding PVA. Material soaked in white glue will be pliable and soft, so to some degree can be shaped, so go ahead and add your stuff, blankets and coverings and be as creative as you like.


When the PVA has mostly dried, to achieve a proper resin feel hardness, I used really thin, cheap superglue to plasticise the pieces, by allowing it to absorb into the PVA cloth. you’ll notice a strange chemical reaction between the glues, but don’t worry, this way will achieve a rock hard finish to the cloth. Who ever said cheap superglue was no good for anything?


Once dried, glue them onto a piece of card for basing, leave them to dry before cutting them out to your desired base sizes.

Undercoat black in your preferred method (or whichever undercoating style you usually use) then proceed to paint up as you would any other miniature or model.


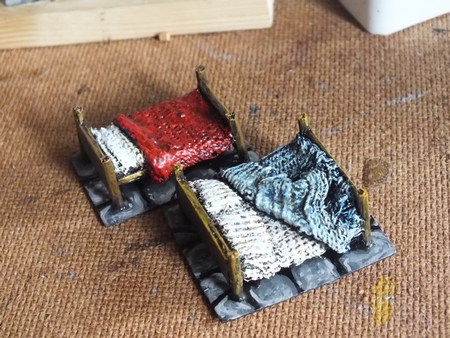
I opted for a dirty scruffy sort, since these beds were destined for use in my dungeon, it made sense they were not clean and tidy (although, if yours are going in a castle or tavern type place, then you could make them as neat as you like) I also paid homage to the beds in Minecraft by making the single one red (since my kids play the hell out of it, it made sense since they’d be playing in the dungeon games too)
That’s all there is to it. Easy. You can elaborate as much as you’d like on the design, add a bigger headboard, chunkier legs, different material used will give a different effect with the textures etc.
Next time, I’ll be back with adventures in expanding foam, to show you how I make modular cavern walls….


2 Responses to “Grim’s Dungeons of Doom: You’ve made your bed, now stick it in your dungeon! Making 28mm beds!”